Showing posts with label Recipes. Show all posts

Saturday, October 25, 2014

Old-Fashioned Banana Bread

Today is a recipe only post. My daughter asked that I put my banana bread recipe here….It is easier for her to find the recipe when she needs it. Since I have no bananas and absolutely no desire to step foot in a store today….no photos.


Old-Fashioned Banana Bread

Makes 1 loaf


  • 1/2 cup shortening (I use Spectrum)
  • 1 cup sugar
  • 2 large eggs
  • 1 teaspoon baking soda
  • 2 cups all-purpose flour
  • 3 large very ripe bananas, sliced

Preheat oven to 350 degrees F. Grease a large loaf pan with shortening.

Cream shortening and sugar. Add eggs and bananas, mix well. Slowly mix in flour and baking soda. Combine well. Put batter into greased pan. Bake for 1 hour, 10 minutes. Cool for 10 minutes in pan. Remove from pan and place on cooling rack.

*I start checking for doneness at 1 hour by sticking a wooden skewer into the center. It doesn’t come out completely clean, but with a few moist crumbs. I find if you wait for a completely clean skewer, you will have dry banana bread.

**If the top of your bread begins to get too brown before it is finished cooking, tent full over the top.


Enjoy,

Sammi

Wednesday, August 13, 2014

Back to Basics…..

or How to spend a rainy morning.

Monday night I sat down and made a tentative menu plan for the week. Tentative because I have a teenage son that likes to throw monkey wrenches into our dinner plans by showing up when he said he wouldn’t be home for dinner….or, alternately, NOT showing up when he said he would. Granted the latter is the better scenario. Either way, menu planning has been a wee bit frustrating lately.

Anyhow…since I knew that Tuesday was suppose to be rainy and on the cool-side, I decided to make life easy for myself and planned for soup and grilled cheese sandwiches. What could be easier to adjust regardless of BoyWonder’s comings and goings?

Tuesday morning rolled around and everything was going great. I packed Man’s lunch. Then I decided to be a darling wife and fix both Man and BoyWonder breakfast sandwiches for the road….neither one of them likes to eat first thing in the morning.

Then that bacon smelled really good. Dangerous stuff that bacon. I gave in and cooked myself some bacon and eggs…and what is bacon and eggs without a side of buttered toast? Like I said…dangerous stuff that bacon. When it was all said and done, there were but a few lonely slices of bread left from a freshly opened loaf. MMM…how did that happen? I mean we are the family that rarely finishes a loaf in an entire week and in one morning……

Ugh? What to do about dinner now? Then reality hit me….

This was my view from the side porch Tuesday morning:

rainy day 1

Another angle:

rainy day 3

And if there is any doubt of what kind of morning, here:

rainy day 2

Yes….our rain was even earlier than expected. So what better way to spend my morning—since I obviously wasn’t going to be doing my normal sitting on the porch routine—than to bake some bread. Yes, my original menu plan was going to be saved. It wasn’t going to be the super easy plan I had originally envisioned, but….that is life.

And I had another great idea! I would do a Basic Bread Baking Tutorial. No frills or thrills. Just back to basics. Sometimes in this fancy, gourmet Pinterest world, we (*I*) forget about the beauty of the basic, simple things in life.

That plan worked great until about half-way through the bread-making process and the phone rang….and I….mmm…..well….forgot to take any more pictures….Especially the ones where I shape the loaves. Oh well….here are a few pictures and a couple of tips…and the recipe. I guess that is the most important thing, the recipe! Just want the recipe and none of my witty commentary and misc. tips? Really? Okay…skip to the bottom. It’s okay….I’m not looking.

Add 2 1/4 cups of milk and 3 tablespoons of butter to a sauce pan. Heat on med-lo to med until the butter melts, stirring occasionally.

butter and milk heating

While that is doing its thing, grab the mixing bowl of you stand mixer. Add 3 cups of all-purpose flour, 2 pkgs of yeast, 2 tablespoons of sugar, and 2 teaspoons of salt.

dry ingredients

Once your butter has melted, grab an instant read thermometer and check the temp of the mixture.
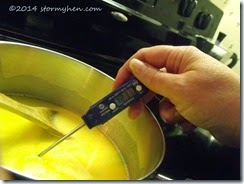
a little too warm

I like to let my mixture cool down to about 105 degrees F. If you add liquid that is too hot to the yeast, you will kill it. I read that up to 120 degrees is okay. Not wanting to be a yeast murderer, I decided to wait on my normal 105. What to do while I wait?

Oh yes, our new-to-us home doesn’t have a dishwasher (or any room to add one!). So I decided to fill a sink with some soapy water to “clean as you go”.  You know that rule, right?

Obviously this picture was taken a little later AFTER I had poured the milk/butter mixture into the mixing bowl.

clean as you go

Which brings me to….. Once the milk/butter mixture has cooled enough, pour it into the bowl with the dry ingredients you added earlier.

add milk mixture to dry

Yep….just pour it right on top. Then take the bowl and attach it to your stand mixer. Then attach your dough hook. Mix on a medium speed for a couple of minutes. Yes, I know that Kitchen-aid says to use speed 2, but I’m a rebel AND the mixture is still quite loose. All you are doing at this point is combining a few dry ingredients and the wet ingredients. Just do not use a speed so high that you have milk and/or flour flying all over your kitchen.

first mix

Turn OFF your mixer and add 2 3/4 cups of flour to the bowl. NOW turn the mixer on to 2 (as recommended by Kitchen-aid) or whatever speed your stand mixer’s manufacturer recommends….because we are about to get serious. Okay…the mixer is about to get serious….for about 4-6 minutes or until the dough clings to the hook and pulls away from the bowl. If it hasn’t done this at the end of the time…add a little bit more flour…say 1/4 cup.

2nd mix

So have you noticed that blur on the last few photos yet? Apparently, I got just a wee bit too close to the milk/butter mixture when I was taking the temp. picture. Yeah…I was a bit slow in realizing what caused that aggravating blur. So, NO, your vision hasn’t gone wonky. I am not sure that the same can be said of mine. Winking smile

After your 4-6 minutes of kneading time is up—as long as the dough has pulled away from the sides of the bowl—turn off the machine, set a timer for 15 minutes and WALK AWAY! Your dough looks a little sticky still? DO NOT ADD FLOUR…just walk away. Seriously, it will be okay.

I should pause to say that right after I took the picture above, my phone rang. And that is why you have no photo of my sticky dough for reference. Sorry. What can I say? I am very easily distracted. And did I mention that on the other end of the line was my BFF from my hometown….and we talked for 2+ hours? I hope that is enough of an explanation for why there are NO MORE photos until the finished loaves were sitting on a cooling rack!

After your timer goes off, go feel your dough. If it is slightly sticky—as in the dough releases easily from you finger when you pull it from the dough—then time to put it into a greased bowl for rising. If there is actually dough stuck to your finger, add your remaining flour 1/4 cup at a time, kneading for a couple of minutes after each addition until the dough is just slightly sticky and place in a greased bowl….make sure to turn once so the top of the dough is greased. Otherwise, you will have a hot mess after it has risen and you try to uncover it. Not that I’ve ever had that experience.

Cover your dough (I use a damp flour sack towel) and put in a warm place to rise until doubled….about 1 hour, depending on the temp. in your kitchen. Since my kitchen is usually on the cool side, I put my dough into a slightly warm oven to rise. (turn your oven on WARM for about 2 minutes, turn off and put you dough in and shut the door….if you don’t have a WARM setting…just heat on about 200 degrees F for a minute)

Once your dough has doubled in size, punch it down and divide it in half. Form each piece into a loaf. You can do this by just gently shaping it with your hands into a loaf shape. This is simple and usually effective. HOWEVER, unless I am in an extreme hurry (or feeling lazy), I prefer to roll each portion into a rectangle (about 9 x 14 inches), removing air bubbles. Then taking a short end and rolling the dough into a tight loaf. Pinch together the seam and ends…tucking the ends under toward the seam side. Then place with the seam side down into a greased bread pan. Shaping the bread in this way eliminates most of the air bubbles that would otherwise become holes in your baked loaves!

See why photos would have been so very useful. If you own a Kitchenaid mixer, this method is illustrated in your owner’s manual/recipe booklet.

Cover your loaves, and allow to rise until doubled. I find that this 2nd rise usually only takes about 30 minutes. If you let it rise too much, you will have excessive air bubbles in your top crust.

Bake your loaves in preheated 375 degree F. oven for 10 minutes. Reduce heat to 350 degrees and continue baking for an additional 20- 30 minutes or until an instant read thermometer inserted into the center of a loaf is 190 degrees F. I cover my loaves with aluminum foil during the last 10 minutes of baking to prevent the tops from getting too brown. Remove bread from pans and allow to cool on a cooling rack for at least 20 minutes….Yes, I know!!! But waiting allows to the bread to finish cooking completely and makes for a much prettier slice.

The finished product:
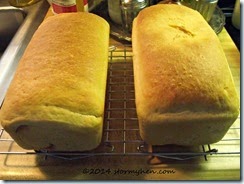
finished loaves

Did I say no frills or thrills? How about one little frill.

cinnamon surprise

I decided to turn one loaf into a cinnamon swirl loaf. When it was rolled out into a rectangle, I spread butter onto it, sprinkled it with a generous amount of coconut sugar and cinnamon, and then rolled it into a loaf—another reason for shaping your loaf by rolling it out!


Basic White Bread

Makes 2 loaves

  • 2 1/4 cups milk
  • 3 tablespoons butter ( or coconut oil or shortening)
  • 3 cups all-purpose flour
  • 2 pkgs. active dry yeast (or equivalent instant yeast)
  • 2 tablespoons sugar (or honey)
  • 2 teaspoon salt
  • 2 3/4 cups to 3 1/4 cups all-purpose flour

Heat milk and butter in a saucepan until butter melts. Allow to cool to 105 degrees F. In the bowl of your stand mixer, add 3 cups flour, yeast, sugar and salt and milk/butter mixture. Place bowl on stand mixer and attach dough hook. Mix on medium speed for 2 minutes. Stop mixer and add 2 3/4 cups of flour to bowl. Knead dough on speed 2 of a Kitchen-aid mixer for 4 to 6 minutes. At this point the dough should be clinging to the hook and pulling away from the sides of the bowl. If it is not, add additional flour 1/4 cup and knead an additional 2 minutes. Allow to rest for 15 minutes. Touch the dough with your finger. If it springs back when you remove your finger, it is ready to rise. If dough is stuck on your finger, add additional flour 1/4 cup at a time, kneading a minute or two after each addition; being careful to NOT add more flour than the total amount above. Place dough in a greased (oiled) bowl, turning the dough to cover in oil. Cover the bowl with a towel and place in a warm place to rise until doubled (about 1 hour). Uncover dough and punch down. Shape into 2 loaves and place into well-greased loaf pans. Cover and allow to rise until doubled (about 30-45 minutes). Bake in preheated 375 degrees F. oven for 10 minutes. Reduce heat to 350 degrees and continue baking for 20-30 minutes. Cover the loaves with aluminum foil if they start to get too brown on top. Remove loaves from pans and cool on a rack for 20 minutes.

Until next time,

Sammi

Monday, October 1, 2012

Mmm Mmm Good

So I’m trying to back up some files and delete some junk from my computer. Because she just ain’t acting right. Anyway, I came across some photos of my chicken and dumplings. Apparently--at some point-- I had decided to share my recipe with you….then didn’t! I found a post promising recipes, but NO recipe. Yes. I’m that blogger. Sorry. I’ll try to do better. So with no further ado:
Chik-n-dumplings
Southern-Style Chicken and Dumplings
· 3 ½ to 4 lbs of bone-in chicken (your choice: whole, thighs, breasts, drumsticks…just use your favorite)
· 2 quarts water
· 1-2 stalks of celery
· 1 onion, quartered
· 1 ½ teaspoons salt
· 2 cups all-purpose flour
· 2 teaspoons baking powder
· ¾ teaspoon salt
· 1/3 cup of shortening (I use Spectrum non-hydrogenated)
Place your chicken in a large pot (remember to remove the giblets if using a whole chicken). Add the celery, onion, and 1 ½ tsp. salt. Cover with water. Bring to a boil. Reduce heat to a slow simmer and cover. Let it cook for an hour or so…until the bird is falling-off-the-bone tender. Remove the chicken from the broth. Strain the broth to remove the veggies and the bones that have probably removed themselves from the chicken. Discard the bones and veggies; return broth to pot. Measure and set aside 2/3 cup of broth. You will need that to make the dumplings!
Once the chicken is cool enough to handle, “pick” the meat from the bones. Yep, just take your hands and pull the meat off. Place the meat into the pot with the broth. Discard the rest of the bones.
Now it is time to make those dumplings! Combine the flour, baking powder, and ¾ teaspoon salt. Cut in the shortening with a pastry blender. (No pastry blender? Get yourself to the nearest….just kidding. Use a fork.) The mixture should be crumbly. Now here’s THE trick to perfect dumplings: (I can’t believe I’m sharing the secret that allows me to turn up my nose at most people’s dumplings…Yes, it is that important to a southern chick!) Check the temp. of your reserved broth. It needs to be VERY warm to HOT. Put in cool broth and your dumplings will not be melt-in-your-mouth delicious! You have been fairly warned. So add the hot broth to the flour mixture and blend until the dry ingredients are moistened. Do not over-blend. Now turn your dough out onto a LIGHTLY floured surface. Knead lightly for about 30-40 seconds. Now roll out your dough to 1/8 inch thickness. Cut your dough into 1 x 2 inch strips. I use my pizza cutter. This isn’t rocket science so don’t worry if your strips aren’t perfect. See…
dumplings
Bring your pot of broth and chicken back to a boil. Now as quickly as you can, drop the dumplings into the broth ONE AT A TIME. Cover your pot, reduce the heat, and simmer for 10 minutes.
Yield: 4 servings (feel free to double…they are even better reheated!)
Enjoy,
Sammi


Tuesday, February 8, 2011

Cranberry-Orange Muffins

Blog stuff 021
Makes 12 muffins
  • 1 cup fresh or frozen cranberries, coarsely chopped (I pulse them in the food processor)
  • 2 cups all-purpose flour
  • 1 cup sugar
  • 1 tsp. salt
  • 1 1/2 tsp. baking powder
  • 1/2 tsp. baking soda
  • 3/4 cup orange juice
  • 1 tbsp. fresh orange zest
  • 1/4 cup shortening
  • 1 egg, slightly beaten
Preheat oven to 400 degrees F.
In large bowl, combine dry ingredients. Add shortening and blend. (you can cut it in with a pastry blender or a fork, BUT I just used my mixer until the shortening was blended in…)Blog stuff 015
Add juice, orange zest, and egg.
Blog stuff 016Blog stuff 017
Mix until dry and wet ingredients are just blended. Stir in the cranberries.
Blog stuff 013
(Can’t believe I forgot to take a picture of the batter while it was still in the bowl!) Spoon into papered or greased muffin tin.
Blog stuff 019
Bake for 20 minutes or until golden brown and a toothpick inserted into the center comes out clean. Transfer your pan to a cooling rack for 5 minutes. Remove muffins from pan and place on cooling rack. If you have the patience you can let them cool for a few minutes. But personally, I like to break one open and spread some butter on it immediately!
Blog stuff 022
YUMMY! I made the mistake of NOT doubling the recipe and they didn’t last one day. I had two for breakfast…then that afternoon I had one with my tea. The other 9? Boy Wonder ate them all before lunch!!! He’s a hard working farm boy….so I let him get away with it! Winking smile
Enjoy!!!
Sammi

Tuesday, January 11, 2011

A Beautiful and Tasty Day

It is a beautiful day here in the upstate of New York. The trees are frosted and gleaming at times when the sun can break the barrier of gray. Though the sun is fighting hard, the clouds seem to be winning. Tiny flakes of snow are slowly falling from the sky, falling so slowly that I am sure that they began falling sometime last week. Yes, it is beautiful.
 1-11-11Outhouse
It is also COLD….a nesting kind of day. So I made these:
Mini muffins 001Mini muffins 002Mini muffins 003Mini muffins 004
SOMEWHERE in my vast collection of recipes, is my original recipe for these little jewels. Alas…I could not find it this morning. So I went online to search for it. I thought that would be quicker than searching through my files, notebooks, etc. I didn’t find the exact recipe, but with a few adjustments* this one turned out just fine.
*I used buttermilk instead of skim milk. I used BUTTER instead of margarine (don’t allow margarine in my house!). I used freshly ground nutmeg (it makes a HUGE difference). I also made a glaze from powdered sugar, cream, and a drop of vanilla extract (sorry…no exact measurements) for a few of them.
Yummy, yummy, good! And the same satisfaction as fresh donuts without all the work!!!
Have a wonderful and blessed day!!!
Sammi

Monday, October 25, 2010

Apple-Cinnamon Granola

Apple Cinnamon Granola
1 cup butter
2 cups brown sugar
½ cup apple juice
¼ tsp. salt
8 cups rolled oats
2 tsp. apple pie spice
In a large sauce pan, melt the butter. Blog Stuff 003
Add the sugar, spice,salt and juice; stir well.Blog Stuff 005
Bring to a boil.
Blog Stuff 006
Reduce heat and simmer for 3-4 minutes. Remove from heat. Add oats and stir well.
Blog Stuff 008
Spread granola evenly over two baking sheets. (I line mine with parchment…I’m lazy that way.)
Blog Stuff 009
Bake at 250˚ for 45- 60 minutes, rotating sheets from top to bottom and stirring oats every 10 – 15 minutes. Remove from oven and allow granola to cool completely before removing from baking sheets. Store in an air-tight container.
Variations:
* During the last 15 minutes of baking, add chopped pecans or walnuts.
* Once granola is cooled, add dried fruit (raisins, cranberries, apple bits, etc.)
 
Obviously, you can serve this in a bowl with milk; but I like it mixed into vanilla Greek yogurt or just plain as a quick snack.
Need a quick dessert? For each serving: peel, core and cut 1 apple. Saute in 2 tbsp. butter. As it begins to soften add about 2 tbsp. sugar (or a couple packs of Truvia). Cook until apple is done to your preference. (I like mine to keep its shape…not too mushy.) Serve in a bowl, topped with 1/4 cup of granola and a scoop of vanilla ice cream.
 
Enjoy!!!

Monday, October 4, 2010

Changing Seasons…and Pantry

It was a bit chilly when I went out to do my errands today (although the hot flash that I was apparently experiencing caused me not to realize it when I first left the house). Anyway….when I walked into the produce section of the grocery store, I saw a pkg. of mango wedges. I really like mango, but when I picked them up to put in the cart I thought, “It’s not mango season. It is apple season.” So back on the shelf they went. Tomorrow I’m going to the store run by a local Amish family (yes, the Yoders) to pick up a 1/2 bushel of apples for $4.
Wow…I’m easily sidetracked…back to the grocery store…. As I walked through the produce department, I grabbed some cabbage, 15 lbs of russet potatoes, and LEEKS. All those items just scream “AUTUMN” to me. Cabbage for unrolled cabbage rolls. A huge bag of potatoes for baked potato soup and stews and chowder…..love me some homemade chowder. As I continued my shopping, I realized that I had been transitioning my pantry over the past few weeks. I have stocked up on boxed stocks (no pun intended), steel-cut oats, apple pie spice (throw a generous pinch in with you ground coffee when you brew it in the morning for a little something different), different flours for baking, dried beans for chili and soups, spiced teas, espresso….just to name a few items. Today I also bought biscotti. I love biscotti; but for some reason, I only buy it during autumn and winter. During the spring and summer, my cookie jar is filled with homemade cookies; but during autumn and winter the cookie jar is filled with biscotti (unless it is close to shopping day…then it’s a little more iffy).  I have recipes for biscotti. It would not be difficult to make them. I’m not sure why I’ve never tried doing so…..except maybe it would be a little too convenient…and therefore DANGEROUS to my already overly abundant waistline.
Does your pantry change with the season? What are your favorite autumn foods?

And now….a recipe:

Baked Potato Soup

First of all….I ALWAYS at least DOUBLE this recipe….It is even better the next day for a quick, filling lunch!
  • 3 tablespoons butter
  • 1/4 cup flour
  • 4 cups milk (I use 1%)
  • 2 cups peeled, cubed russet potatoes
  • 1/2 cup minced leeks—white part only (can also use a regular onion or shallot…your preference)
  • 3/4 teaspoon salt
  • Garnish: chives, shredded cheddar cheese, REAL bacon bits (either store-bought or homemade), fresh ground black pepper
Melt butter in heavy-bottom stock pot over low heat. Add flour and stir until smooth. Cook, CONSTANTLY stirring for 1 minute. Slowly stir in milk (I use a whisk). Stir in potatoes, leeks, and salt. Cook over medium heat, STIRRING FREQUENTLY, 30 minutes or until thick and potato is done. Serve with choice of garnishes. Makes 5 cups.

***This recipe is SIMPLE, SIMPLE, SIMPLE. However, do not get distracted and forget to stir it. It burns easily, and burnt potato soup is not good. I once gave this recipe to one of my NON-cooking family members thinking that there was absolutely NO WAY that she could mess this up. Let’s just say that she REALLY needs one of those self-stirring gadgets that you’ve probably seen in some catalog or infomercial.
This is also a great recipe for potluck dinners. Just make as directed, doubling or tripling or even quadrupling the recipe. Then transfer to a crockpot and keep on the warm setting…just be sure to stir occasionally.
Enjoy!

Thursday, September 30, 2010

Evil…pure evil

I really should not spread this temptation. They are truly evil. They call your name morning, noon, and night…..from the cookie jar.
more blog stuff 005

Chocolate Chip-Coconut Teacakes

  • 2 sticks (1 cup) salted butter, softened
  • 1/2 cup sifted confectioners’ sugar
  • 1 teaspoon vanilla extract
  • 2 1/4 cups all-purpose flour
  • 1 cup sweetened, shredded coconut
  • 1 cup mini semi-sweet chocolate chips
  • sifted confectioners’ sugar for dusting
Preheat oven to 350 degrees F.
Cream the butter until light and fluffy, using an electric mixer. Add sugar and mix well. Add vanilla and mix. Slowly add flour; mix well. Stir in the coconut and chocolate chips, mixing well. Roll dough into 1-inch balls and place 1-inch apart on ungreased cookie sheets (I DO line mine with parchment paper). Press each cookie with your thumb to flatten slightly.
Bake cookies for 8-10 minutes, or until edges just start to turn golden. Transfer to racks and dust with powdered sugar while still warm. Cool completely. They may be stored in an airtight container for about a week.*
*Good luck getting them to last that long….although they do taste better if you can make yourself wait a day for the flavors to develop.

These make WONDERFUL Christmas and Valentine’s Day gifts. They are simple to make and they store well.
Enjoy,

Wednesday, September 22, 2010

Quick and Easy Meal-Stroganoff-Style “Hamburger Helper”

Here is a homemade version of Hamburger Helper. It is much healthier than the boxed version. You can mix the dry ingredients ahead of time and store them in a ziploc bag in your pantry.

Stroganoff-Style “Hamburger Helper”

Dry ingredients:
  • 8 oz. dry egg noodles (I usually use whole wheat noodles)
  • 1 cup instant dry milk
  • 1/2 tsp. paprika
  • 1 tsp. salt
  • 1/8 tsp. pepper
Combine all the dry ingredients.
Additional ingredients:
  • 1 lb. ground beef
  • 4 oz. can mushrooms stems & pieces, undrained
  • 4 cups water
  • 1/2 to 1 cup sour cream
  • 1 tsp. Worcestershire sauce (optional)
Brown ground beef in large skillet; drain. Add water, mushrooms, and your dry ingredients; stir to mix. Bring to a boil. Reduce heat and simmer until water is absorbed and noodles are tender—about 15 to 20 minutes. Remove from heat and stir in sour cream and Worcestershire sauce.
Serve with a tossed salad.

Quick and Easy Meal-Mexican Bean Soup

Recently a friend asked for some quick, easy, INEXPENSIVE meal ideas. I thought I would share my ideas here on the blog. I’m sure she is not the only one that would like some fresh ideas.
First up is a slow-cooker meal that is perfect for cooler weather. Most of the ingredients can be bought at your local Aldi.

Mexican Bean Soup

Serves 6 (I double or even triple this…of course, I love leftovers)
  • 1/2 lb ground beef
  • 1 small onion, diced or 1 tbsp. dried onion flakes
  • 1 garlic clove, minced or 1/8 tsp. garlic powder
  • 1 (14 1/2 oz.) can chicken broth
  • 1 can tomatoes with green chilies (Rotel is one brand…but Aldi has its own brand)
  • 1 (15 oz.) can pinto beans, drained
  • 2 tsp. chili powder
  • 1 tsp. cumin
  • 1/4 tsp. cayenne pepper
  • salt and pepper, to taste
Brown ground beef with onion and garlic, if you are using the fresh option—flakes or powder can be added later. Drain ground beef, if necessary. Combine browned ground beef and remaining ingredients in slow cooker. Cook on low for at least 6 hrs.
Serve this with cheese quesadillas. My family likes to top their soup with a little sour cream and shredded cheese. We also like our soup a little spicier. Therefore, add a 4 oz. can of green chilies and a little more chili powder and cayenne.
For those with a real time crunch in the a.m., you can brown your ground beef ahead of time and refrigerate until needed. You can even brown several pounds (especially when you find ground beef on sale) and freeze in appropriate portions to use when needed.
Bon Appétit!

Sunday, August 22, 2010

Sunday Morning Breakfast

Blog stuff 008
Buttermilk Pancakes
Dry Ingredients:
  • 1 cup whole wheat flour
  • 1 cup all-purpose flour
  • 1 teaspoon baking soda
  • 1/2 teaspoon salt
Wet Ingredients:
  • 4 tablespoons butter, melted
  • 2 eggs
  • 2 cups buttermilk
  • 4 tablespoons real maple syrup
Put dry ingredients in a medium mixing bowl. Stir to mix. In a small bowl, mix: melted butter, eggs, buttermilk and maple syrup. Add the wet ingredients to the dry ingredients. Stir to mix. DO NOT OVERMIX….small lumps are okay.
Cook on a prepared griddle (medium heat). Makes approx. 12 pancakes.
*NOTE: I have also made these pancakes using all whole wheat flour (2 cups total) with great results.

Wednesday, July 7, 2010

Wonderful Wednesday—July 7, 2010

Checking out the garden:
July 7, 2010 001 July 7, 2010 004 July 7, 2010 005 July 7, 2010 006 July 7, 2010 007 July 7, 2010 008

What’s for supper?
July 7, 2010 009 Preheat oven to 350 degrees F.
July 7, 2010 010 Place bone-in chicken pieces into baking dish. Sprinkle both sides generously with House Autry Chicken Breader (or a blend of flour, salt, and pepper). Cut approx. 4 tbsp. of butter into small pieces and space evenly on top of chicken.
July 7, 2010 011
Pour about 1/2 to 3/4 inch of water into baking dish, being careful to not wash the breader from chicken. Place in oven for 1 hr. 15 min. Then carefully spoon some of the cooking juices over the top of the chicken. Continue baking for another 15 – 30 minutes, or until chicken is done and golden brown. Remove chicken from baking dish onto serving platter. OR if your family is unexpectedly delayed (as mine was), place into another baking dish (you want to remove it from the cooking juices to keep it nice and crispy) and place into a warm oven to await their arrival.
July 7, 2010 013

Since I had “extra” time, I even made decided to fill the cookie jar! ;-)
July 7, 2010 020

Yes, it was a wonderful Wednesday.

LinkWithin

Related Posts Plugin for WordPress, Blogger...